Filed under: Food and Recipes, Main Dishes | Tags: america's test kitchen, cooks illustrated, dutch oven cooking, fall dishes, minestrone, minestrone soup, vegetable soup
You may have noticed an absence on here lately. Life gets in the way. It is busy, messy, and time consuming. One finds other occupations of time and things like this blog drift back in priorities.
A catch up: a new shift at work, a few doctors trips and varied illnesses, a vacation, and a new focus on simple and quick eating. It’s what has helped get us through the last few months.
We returned from our vacation this past week, and now that the weather has turned cooler, all I could think about was soup. So I made this vegetable soup I had been jonesing to make ever since seeing it made on America’s Test Kitchen last season. Hope it makes you feel as warm and invited in your home as it did ours!
Hearty Minestrone Soup
Recipe courtesy of America’s Test Kitchen and Cook’s Illustrated
If you cannot find dried cannellini beans, no worries. Just subsitute navy or great northern beans. You can also substitute bacon for pancetta. If you don’t have a parmesean rind laying around in your freezer like I did, then just cut up a few small chunks and throw in. No worries. This would also be a great soup to subsitute in seasonal vegetables like winter squashes or different greens. Mix it up; be your own chef.

INGREDIENTS:
1/2 lb dried cannellini beans, rinsed and picked over (about 1 cup)
1 tablespoon extra virgin olive oil
3 ounces pancetta, cut into 1/4-inch pieces
2 medium celery ribs, cut into 1/4-inch pieces
1 medium carrot, peeled and cut into 1/2-inch pieces
2 small onions, peeled and cut into 1/2-inch pieces
1 medium zucchini, trimmed and cut into 1/2-inch pieces
2 medium garlic cloves, minced
1/2 small head green cabbage, halved, cored, and cut into 1/2-inch pieces
1/8 teaspoon red pepper flakes
8 cups water
2 cups low sodium chicken broth
1 piece parmesan cheese, rind (about 5-inchx2-inch)
1 bay leaf
1 1/2 cups v 8 juice
1/2 cup chopped fresh basil leaf
fresh ground black pepper
grated parmesan cheese, for serving
1. Dissolve 1 1/2 tbsp salt in 2 qts. cold water in large bowl. Add beans and soak at room temperature for at least 8 hours and up to 24 hours. Drain and rinse well.
2. Heat oil and pancetta in large Dutch oven over medium-high heat. Cook, stirring occasionally, until pancetta is lightly browned and fat has rendered, 3-5 minutes. Add celery, carrots, onions, and zucchini; cook, stirring frequently, until vegetables are softened and lightly browned, 5-9 minutes. Stir in garlic, cabbage, 1/2 tsp salt and red pepper flakes; continue to cook until cabbage starts to wilt, 1-2 minutes longer. Transfer vegetables to rimmed baking sheet and set aside.
3. Add soaked beans, water, broth, Parmesan rind, and bay leaf to now-empty Dutch oven and bring to boil over high heat. Reduce heat and vigorously simmer, stirring occasionally, until beans are fully tender and liquid begins to thicken, 45-60 minutes.
4. Add reserved vegetables and V8 juice to pot; cook until vegetables are soft, about 15 minutes. Discard bay leaf and Parmesan rind, stir in chopped basil, and season with salt and pepper. Serve with olive oil and grated Parmesan. I liked those little soup crackers in mine too! Or a crusty piece of bread to sop up the juices would work great on the side.
Filed under: Dessert, Food and Recipes | Tags: cream cheese icing, cupcakes, paula deen, red velvet cupcakes
Red velvet has a special place in our hearts. It’s one of the few desserts that my husband will eat, and it was served to us on the night of our rehersal dinner. The first Valentine’s Day after we were married, I made these cupcakes in cute little silicone heart shaped cupcake molds. I’ve been making them ever since.
Recently, a group I’m involved with at work had a bake sale. I made these, and people flocked to them. I add a little vanilla bean to the icing so you get those cute little specks througout the frosting. Store leftovers in the fridge to keep the icing at its peak.
Don’t even think about the WW points on this one… It’s a treat, and it’s a Paula Deen recipe. That means butter, lots of it! If I know it’s just going to be and my husband snacking on them, I’ll split the recipe in half. Works good either way!
Red Velvet Cupcakes
Recipe slightly adapted from Paula Deen
Makes 24 cupcakes

INGREDIENTS:
For the cupcake:
2 1/2 cups all-purpose flour
1 1/2 cups sugar
1 teaspoon baking soda
1 teaspoon salt
1 teaspoon cocoa powder
1 cup vegetable oil
1 cup buttermilk, room temperature
2 large eggs, room temperature
2 tablespoons red food coloring
1 teaspoon white distilled vinegar
1 teaspoon vanilla extract
For the Icing:
1 pound cream cheese, softened
2 sticks butter, softened
1 teaspoon vanilla extract
4 cups powdered sugar
1 vanilla bean, seeds removed
1. For the cupcakes: preheat your oven to 350. In a bowl, mix together your wet ingredients (oil, buttermilk, eggs, food coloring, vinegar, and vanilla) until well combined. You can use either a hand mixer, whisk, or stand mixer. In a seperate bowl, sift together your dry ingredients (flour, sugar, baking soda, salt, and cocoa powder). Add the dry ingredients to the wet and mix until well combined.
2. Line a muffin pan with liners and fill each cup 2/3 full. Bake for 20-22 minutes or until a toothpick inserted comes out clean.
3. Set out cupcakes to cool. While they are cooling, whip together your cream cheese and butter, whipping on medium high until thoroughly combined. Add vanilla extract and beans. Add powdered sugar slowly, whipping on high until icing is light and fluffy. Once the cupcakes are fully cool, cover generously with icing and serve.
Filed under: Food and Recipes, Main Dishes | Tags: chicken tacos, crock pot, Mexican food, slow cooking, tacos
These tacos are so good, I’ve made them twice since discovering them and still haven’t grown tired of the recipe. I’m not exactly sure where the recipe originated, but a friend from work told me how to make the tacos. It’s so easy; it’s almost like not cooking, and is amazingly healthy! If you have chicken breasts in the fridge, that’s fine, but you can actually start them from completely frozen, which makes the dish even easier to make. Seriously, make these soon! You won’t be disappointed!
Crock Pot Chicken Tacos
Recipe courtesy of Jennifer Burkeen
4 WW PointsPlus per serving, makes 10 servings

4 boneless skinless breasts
1 small jar pace picante salsa (you choose the heat, I do medium)
1 packet taco seasoning
Place chicken in the bottom of your crock pot and cover with salsa and seasoning. Cook on low for 6-8 hours. Remove the meat, shred, return back to the sauce and stir to combine. Dip out into tortillas and top with toppings of choice.

Filed under: Dessert, Food and Recipes | Tags: cheesecake, dessert, new York style cheesecake, pecan crust, springform pan
This year, for his birthday dessert, my husband requested cheesecake. If you know my husband, then you know how much of a triumph this moment is for me. Starting off as a picky eater when we both were wed, his tastes have broadened slightly, making me a very, very happy girl.
I have been making this cheesecake for years now, and it’s my absolute favorite. A pecan crust, creamy center, and ease of preparation make this dessert worthwhile.
Vanilla Bean Cheesecake
Recipe courtesy of Ganache

INGREDIENTS:
For the crust:
2 cups Graham cracker crumbs
1/2 cup chopped pecans
4 tbsp melted butter
2 tbsp sugar
For the cheesecake:
4 8 oz blocks of cream cheese, at room temperature
1 cup sour cream
1 tsp vanilla extract
1 vanilla bean, split, seeds removed
1 tbsp flour
4 eggs
1 cup sugar

Line the outside of a 9 inch springform pan with tin foil, crimping it around the pan to make a waterproof barrier.
Preheat your oven to 350.
Mix crust ingredients together in a bowl and press into the bottom and up the sides of a 9 inch springform pan. The bottom of a measuring cup or large glass works great in pressing the crust up the sides and packing in all the crumbs for you!
Bake for 10 minutes, at 325, until crust is set and slightly brown. Remove and let cool slightly. Crank your oven up to 450.
Meanwhile, in the bowl of a food processor or with a stand mixer, combine cream cheese and sugar until well blended and slightly fluffy. Add eggs, one at a time, blending well after each use. Add remaining ingredients and blend well. Pour into cooled crust.
Place unbaked cheesecake into a larger baking pan where the springform pan can sit flat. Pour in recently boiled water in the larger pan to create a hot water bath, being careful not to splash into the cheesecake.
Bake at 450 for 10 minutes, reduce the oven to 250, and not opening the oven, bake for one hour. Remove the cheesecake from the oven and the water and allow to cool at room temperature. Remove the foil and cool the cheesecake in the fridge overnight to set properly. Next day, slice and serve.
Filed under: Food and Recipes, Side Dishes | Tags: bell pepper, Confetti corn, corn, corn on the cob, sautéed corn
Last summer I started making this dish after receiving Ina’s cookbook, Back to Basics, as a birthday gift. It has been my favorite cookbook of hers, and I’ve made several recipes from it. One of which appeared in my first post on this blog.
It’s cheap as chips to make, uses up those vegetables that are in abundance right now, and showcases them for their full summer glory. Seriously, I could make a meal out of this stuff alone.
Go to your farmer’s market this weekend. Stock up. Make this with your dinner; it’s great served alongside a lean protien like baked chicken or a baked ham. You won’t regret that you did.
Ina’s Confetti Corn
Slightly adapted from the Back to Basics Cookbook
4 WW Points Plus per serving, makes 6 servings

4 ears fresh corn, husked and kernels cut off the cob
1/2 red bell pepper, diced
1 orange bell pepper, diced
1/2 green bell pepper, diced
1 small red or yellow onion, diced
2 tbsp fresh chopped basil
2 tbsp butter
1 tbsp olive oil
Salt/pepper to taste
1. Heat a large sauté pan over medium high heat and add olive oil.
2. Once pan and oil is heated well (when the oil starts to shimmer), add onion and sauté until golden brown. At this time, add diced peppers, sauté another 2 minutes.
3. Add corn and butter, season generously with salt and pepper, and sauté another 5-6 minutes until the corn is crisp and no longer starchy.
4. Remove from heat, stir in basil, taste, adjust seasoning as necessary, and serve.
Filed under: Drinks, Food and Recipes | Tags: banana, chocolate, morning smoothie, Nigella Lawson, smoothie
My favorite episode of Nigella Lawson’s is one about breakfast. I love breakfast; it’s my favorite meal of the day. In this episode she makes spicy scrambled eggs (which I’ll share on another day) and this smoothie.
I love everything about this smoothie. It makes me feel like I can conquer the day, and while being nutritious and giving me my caffiene kick, it also seems naughty. Like dessert for breakfast. When I was little, my dad made me bananas drizzled with chocolate syrup for a dessert. This shake reminds me exactly of that. It’s cold, but warms me from the inside out with recollected memories, which is what I need in this 100 plus degree heat on an early Memphis morning.
Go Get ‘Em Smoothie
Recipe slightly adapted from Nigella Lawson
4 WW Points Plus

1 banana, peeled and broken into pieces
1 packet reduced calorie hot chocolate mix
1 cup fat free milk
1-2 tsp instant espresso powder (depending on your caffiene needs)
1 cup ice
Take all ingredients and blend until smooth in a blender. Pour into your favorite on-the-go mug, add a straw, and face your day!
Filed under: Breads, Food and Recipes | Tags: homemade pizza, homemade pizza dough, Jamie Oliver, Pizza crust
Pizza is all about the crust, and this crust is top notch. It makes homemade pizza an awesome weeknight staple, can get the kids involved in helping with dinner by adding toppings, and makes enough to feed a large hungry family or enough for leftovers the next day.
My favorite breakfast?? Cold leftover pizza and coffee…
Jamie Oliver’s Pizza Dough
Recipe courtesy of The Wednesday Chef

3 1/2 cups all purpose flour
1 1/2 to 2 teaspoons table salt
1 packet (1/4 ounce) active dry yeast
1 1/2 teaspoons sugar
2 tablespoons olive oil
1 1/4 cups lukewarm water
1. Combine yeast, sugar, oil, and water in a bowl, stir, and let sit until it’s foamy. Mix together your flour and salt together in a large bowl, make a well in the middle, and pour in your liquid yeast mixture. Using a fork, stir your liquid mixture, bringing in small amounts of flour, until you have a shaggy kind of mess. Dump out onto a floured board and knead all together for about 5 minutes, until it comes together into a smooth dough.
2. Wash out your bowl you mixed the dough in, dry it, and drizzle in a little olive oil to coat the bowl. Place in the ball of dough, turning it over to coat it with oil as well, cover it with a towel, and stash it in a warm space in your kitchen. Let it rise an hour until doubled in size.
3. After the rising, turn the dough out onto a floured surface, slightly punching down the dough, or pushing some of the air out of it. Cut the dough into two equal portions. Each piece is enough to be stretched and pressed into a sheet pan that has been coated with nonstick spray. Will make 2 thin pizzas. If you prefer a thicker pizza dough, just use the whole ball of dough in one sheet pan instead of dividing it between two.
4. Cover with toppings of choice, crank your oven up to 500 degrees, and bake your pizza on the sheet pan until browned, bubbly, and delicious.
Filed under: Food and Recipes, Main Dishes | Tags: boneless fried chicken, boneless skinless chicken breasts, cast iron skillet, Fried chicken, garlic fried chicken, skinless chicken breasts
It’s been way, way too long since sharing a recipe or two on here.
Here’s what’s been going on lately: a family surgery, a bug infestation in the garden that resulted in ripping out my zucchini plant, a malfunctioning coffee maker, my dog ate my favorite undergarments, sleeping in the guest bedroom because of new house construction next door, a re-discovered love of reading, car shopping, bidding Harry Potter farewell, and my husband is a year older!
Yes, from the everyday mundane details to the big events, July is quickly escaping. Before we know it, we’ll be bundled by the fire, ringing in the new year, and wondering where the past one went. It never ceases to amaze me how with each passing year, life continues to whiz by at a faster rate.
It makes me want to seize life, grab it for all it’s worth, and eat fried chicken. This was my husband’s birthday requested dinner this year. Paired with some mashed potatoes and green beans, and with fried green tomatoes, we had a comfort food feast fit for two. Just how we like it.
Garlic Fried Chicken
Recipe adapted from Southern Living Ultimate Quick and Easy Cookbook

4 boneless skinless chicken breasts, cut into approximately 3-4 strips each
2 cups flour
1 cup milk
2 eggs
Tabasco, to taste
1 tsp paprika
1 tsp garlic powder
1 tbsp salt
1 tsp ground black pepper
Cayenne, to taste (I used 1 tsp)
Oil, for frying
1. Cut all chicken into strips. Mix together milk, eggs, and desired amount of Tabasco. I use several dashes. Soak chicken in milk mixture while prepping other ingredients.
2. In a large zip-top bag, mix flour, salt, pepper, and other spices. Shake to mix well.
3. In a 9 inch cast iron skillet placed over medium-high heat, pour in oil until 2/3 full. Allow oil to heat until glistening, slightly bubbling, and a small amount of flour dropped in as a test sizzles well.
4. Move chicken pieces from milk mixture to zip-top bag, seal, and shake to coat well.
5. Working in batches, place about 5-6 pieces of coated chicken into the hot oil, being careful not to splash. Turn occasionally, and cook until golden brown on all sides. Place on a paper towel lined plate to drain and cool. Continue until all chicken is cooked. Serve.

Filed under: Dessert, Food and Recipes | Tags: buttercream, cupcakes, hummingbird cake, hummingbird cupcakes, vanilla cream cheese icing
Cupcakes are all the rage these days. There’s a cupcake store on nearly every corner with a delicate cake, piled high with frosting, calling your name.
Maybe with nursing I’m in the wrong business. I long to be covered and flour and powdered sugar serving delectables to the public. But, for now, I cook for those I love, the families and friends that make life sweeter.
I made these for a wedding shower not too long ago, and they were a hit! Better than your cupcake store on the corner, you can serve up a little portioned controlled sweet from your oven (unless you eat more than one, which is possible with these!).
Hummingbird Cupcakes
Recipe courtesy of marthastewart.com

INGREDIENTS:
1 1/4 cups all-purpose flour
1 1/2 teaspoons baking powder
1 teaspoon ground cinnamon
1/4 teaspoon freshly grated nutmeg
1/4 teaspoon salt
1/2 cup (1 stick) unsalted butter
1 cup granulated sugar
2 large eggs, room temperature
1 cup mashed ripe bananas (from about 3 large bananas)
1 tablespoon clover honey
1 cup chopped pecans
1/2 cup crushed pineapple, drained
1/4 cup hot water
1 batch of vanilla bean cream cheese icicng (see recipe below)
1.Preheat oven to 350 degrees. Line a standard 12-cup muffin tin with cupcake liners; set aside.
2.In a medium bowl, whisk together flour, baking powder, cinnamon, nutmeg, and salt; set aside.
3.Place butter in the bowl of an electric mixer fitted with the paddle attachment; beat on medium speed until fluffy. Add sugar, and cream together until well combined, 2 to 3 minutes.
4.Add eggs, one at a time, beating slowly after each addition. Add banana and honey and mix on low until well combined. Add pineapple; mix on low until combined. Add 1/2 cup pecans; mix on low until well combined.
5.With the mixer on low, slowly add one-third of the flour mixture, followed by one-third of the hot water. Repeat process twice, alternating flour mixture and hot water, and ending with hot water. Mix until just combined.
6.Fill each muffin cup two-thirds full with batter. Transfer to oven and bake until a toothpick inserted into the center comes out clean, 24 to 26 minutes. Transfer pan to a wire rack; let cupcakes cool completely.
7. Top with icing and remaining chopped pecans.

Vanilla Bean Cream Cheese Icing
Recipe slightly adapted from marthastewart.com
INGREDIENTS:
1/4 cup (1/2 stick) unsalted butter, room temperature
4 cups confectioners’ sugar, sifted
1/4 teaspoon pure vanilla extract
6 ounces cream cheese, room temperature
1 vanilla bean, split, seeds removed
Combine butter, sugar, vanilla extract, cream cheese, and vanilla bean seeds in a mixer and mix until well combined and fluffy.
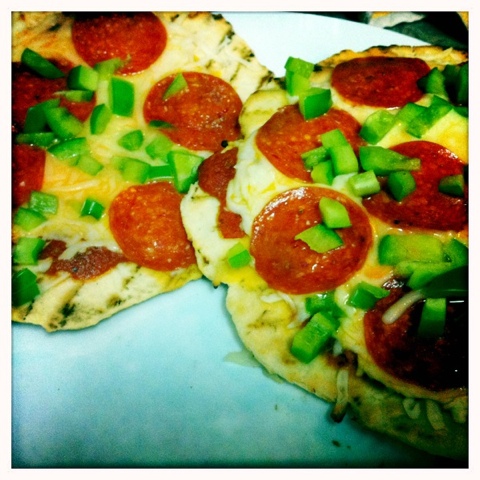
Filed under: Breads, Food and Recipes, Main Dishes | Tags: grilled pizzas, grilling, July 4th, pizza
Last night, in the cooler, but still sweltering humidity, my husband and I did a first. We grilled pizzas.
I thought it would be a perfect time to share these, since July 4th is right around the corner. They were delicious! Once again, weber grill recipes never disappoint, this pizza tasted like it was straight from a brick oven!
Grilled Pizza
Recipe slightly adapted from Weber Grill IPhone App
Dough recipe:
2 to 2 1/2 cups all purpose flour
3/4 cup warm water
1 tsp granulated sugar
1 tsp kosher salt
1 packet dry active yeast
3 tbsp olive oil
Pizza topping ideas:
Tomato sauce
Red pepper flakes
Dried oregano
Shredded mozzarella
Goat cheese
Chopped basil
Pepperoni
Canadian bacon
Green bell pepper or roasted red peppers
1. In a large bowl, mix together yeast, sugar, and water. Stir, and allow to sit for 10 minutes until foamy. Add remaining salt, oil, and 2 cups flour. Stir until dough forms. If still slightly wet, add remaining 1/2 cup flour.
2. On a floured surface, knead dough for 5 minutes, or until it becomes smooth. Place in a greased bowl and allow to rise in a warm part of the room for 1 and 1/2 hours, or until doubled in size.
3. After rising, cut dough into 4 equal pieces. On a piece of parchment, press or roll each piece of dough into an 8 inch round.
4. Preheat your grill, either charcoal or gas. Take dough and grill each piece (without the parchment of course) over direct heat for a few minutes, until browned a crispy. Remove crust, placing grilled side up, onto a baking sheet. Cover with desired toppings (take care not to soak the pizzas with tomato sauce, you don’t want them soggy). Place back onto grill, lid on, and allow to cook a few more minutes for the other side of the dough to get brown and crisp, cheese to melt, and toppings to warm though.
5. Remove, slice, serve.